A6M2 Model 21 Zero (Reconstruction) Photo Archive
Photos 2005–2015
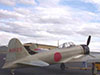
Photos by Ryan Toews, 1999
Photos via Jim Lansdale / Robert Rocker, 2005
Photos via "A Brief History of the Blayd Zero and Its Markings" by Ryan Toews, 2014
Photos by Ryan Robinson, August 18, 2014
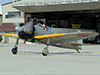
Photos by Angel Natal, April 7, 2015
Photos by Ryan Toews, 2017
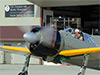
Photos by Jeremy D. Dando, June 20, 2015
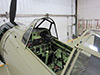
Photos by Ryan Toews, October 19, 2018
Photos by Ryan Toews, October 20, 2018
Contribute
Information
Do you have photos or additional information to add?
|