|
|
|
|
| Missing In Action (MIA) | Prisoners Of War (POW) | Unexploded Ordnance (UXO) |
| Chronology | Locations | Aircraft | Ships | Submit Info | How You Can Help | Donate |
|
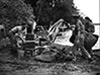 AWM March 16, 1945 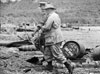 AWM April 4, 1945 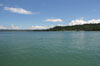 Justin Taylan 2012 |
Location Waitavalo is located on the southern coast of New Britain bordering Henry Reid Harbor inside Wide Bay. Pronounced "Wai-tav-alo". Also spelled Waitavolo. To the west is the Henry Reid River and to the east is Tol. Prewar and during the Pacific War located in New Britain District in the Territory of New Guinea. Today located in East New Britain Province in Papua New Guinea (PNG). Prewar Waitavalo Plantation was planted with coconut palms harvesting copra. Wartime History During early February 1942, occupied by the Japanese Army. On February 4, 1942 four separate massacres of prisoners happened at Tol and Waitavalo. At Waitavalo Plantation, 35 Australians prisoners were shot by the Japanese. In total, 141 Australians soldiers of "Lark Force" that retreated from Rabaul across New Britain were captured and executed, the majority at Tol Plantation. Two survived a massacre there: Pte H. J. "Nipper" Webster and Pte Webster (died of wounds March 1, 1942). On February 3, 1942 a group of eleven Australian Army soldiers including Pte Webster were captured and marched to Waitavalo Plantation house, tied u p and fired on. Webster was hit in the thumb and side and fainted, and when he awoke the Japanese had departed. Meanwhile, Pte Walkley managed to hide in Waitavalo Plantation for three days and found Webster, but decided to wander off alone, fearing the Japanese would recognize him. On February 14, 1942 he found Lt. Figgis, but he died March 1, 1942 from wounds. Japanese Army officer, Colonel Masao Kusunose, 3rd Battalion Commander, 144th Infantry Regiment, 55th Division was deemed largely responsibility for the massacres at Tol and Waitavalo. He survived the war and was detained postwar but committed suicide before facing justice. By early 1945, the Japanese had dug positions on a long low narrow ridge inland from Waitavalo. On March 5, 1945 at 9:00am the Australian Army, 19th Battalion, "A" Company attempted to cross the mouth of the Henry Reid River twice under fire, twice and were repulsed. Afterwards, they crossed unopposed upriver. In the afternoon the Japanese began to use heavy mortars, concentrated on battalion headquarters until a lull during the night. For the next twelve days, fighting continued for the hilltops and inland ridges. During the night of March 16-17, the Japanese withdrew but their mortars continued to fire. On March 17, the Australians attacked and occupied Waitavalo without further opposition. On April 4, 1945 General Thomas Blamey plus other senior officers arrived by LCVP to Waitavalo to inspect Australian troops in the area. During June 1945, the situation was generally quiet throughout as the Australians established their perimeters in the area and engineers widened and surfaced the roads around Tol and Waitavalo. Today During May 2012, a logging camp is located at Waitavalo. Reportedly, there was an Australian concrete memorial near the camp. Henry Reid River Located to the west of Waitavalo, the Henry Reid River runs roughly north to south and empties into Henry Reid Harbor. On March 5, 1945 at 9am, "A" Company of the 19th Battalion made two attempts to cross the Henry Reid River near the mouth, but sustained Japanese fire drove them back. Moving up river about 300 yards, the crossing was made unopposed. The company then moved downstream in an attempt to outflank the Japanese, but they had withdrawn. Cake Hill Dubbed "Cake Hill" by the Australian Army, their first objective at Waitavalo. At dawn on March 6, 1945 the Australian artillery opened up again and the infantry followed. "A" Company of the 19th Battalion passed through "C" Company and, meeting only slight opposition, advanced towards Cake Hill. At 11am, from positions on Lone Tree Hill, the Japanese pinned the company down with machine-gun and rifle fire, halting the advance for an hour. When they fell back, "A" Company to occupied Cake Hill. "C" Company then came up and consolidated the area while "A" Company moved into a less exposed position. During the next three days the Australians continued to attack but met only slight opposition but suffer casualties from Japanese mortar fire. Lone Tree Hill Dubbed "Lone Tree Hill" by the Australian Army. During March 6-7, 1945 the Japanese pinned down the Australian advance for an hour from this position, with rifle, machine gun and mortar positions, then fell back. Moose Hill The Australian troops occupied a higher feature above Waitavalo ridge dubbed "Moose Hill". There they came under harassing fire from Japanese mortars, and suffered casualties. Afterwards, rains caused a lull in activity as the Australians regrouped and supply lines were organized and the 19th Battalion was relieved by the 14th/32nd Battalion. Bacon's Hill (Bacon Hill) Dubbed "Bacon Hill" or "Bacon's Hill prewar. On the morning of March 16, the Australians attacked again. RAAF Beauforts went in on low-level bombing runs then Australian artillery began shelling. Next, "B" Company of the 14th/32nd Battalion, advanced northwards to the high ground of Bacon's Hill. Two platoons were held up by machine-gun and mortar fire, so a third platoon moved around the left flank and took up a position only fifty yards from the Japanese perimeter. The Japanese were well dug in, and his cross-fire was well planned. Walnut River (Walwut River) River running roughly north to south, connects with the Henry Reid River inland from Waitavalo. During the night of March 16-17, 1945 two Japanese aircraft flew over the bridge crossing the Walnut River and dropped two large bombs and smaller anti-personnel bombs, causing a few casualties. This was the only occasion when the Japanese bombed Australian ground troops in the area. Contribute
Information Last Updated
|
Photo Archive |
| Discussion Forum | Daily Updates | Reviews | Museums | Interviews & Oral Histories |
|