|
|
|
|
| Missing In Action (MIA) | Prisoners Of War (POW) | Unexploded Ordnance (UXO) |
| Chronology | Locations | Aircraft | Ships | Submit Info | How You Can Help | Donate |
|
| USAAF 7th AF 11th BG 431st BS 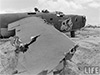 LIFE c1943 |
Aircraft History Built by Consolidated at San Diego. Construction Number 982. During construction, the wing spar with Construction Number 982 was used in B-24D 41-24186. On October 24,1942 the wings were mated to the fuselage. On November 6, 1942 off the production line. On November 11, 1942 a shake down was completed. On November 12, 1942 accepted by the U.S. Army Air Force (USAAF) as B-24D-20-CO Liberator serial number 41-24187. Flown to Fort Worth, TX and allocated modification line number 168 and given SUMAC mods for Pacific service completed by December 15, 1942. On December 17, 1942 this bomber flew a check flight before delivery to the Army. Assigned to VII Bomber Command and was ferried from the west coast to Hickam Field. On April 29, 1943 inducted into the Hawaiian Air Depot (HAD) at Hickam Field for nose turret modification into a D-1 model. On May 7, 1943 returned to VII Bomber Command. Wartime History Assigned to the 7th Air Force (7th AF), 11th Bombardment Group (11th BG), 431st Bombardment Squadron (431st BS). Nicknamed "Little Hiawatha" with the nose art of an American Indian character with a single feather holding a bomb in one hand painted on a white background. On the right side of the cockpit was a Japanese flag indicating an enemy plane shot down. On November ?, 1943 took off from Funafuti Airfield piloted by Larry Cowell with co-pilot Al Miller on their first combat mission staging through Tarawa Airfield on a bombing mission bound for Wotje. Inbound to the target at an altitude of 10,000', the formation encountered a massive weather front that required each bomber to fly on instruments for two hours. In the bad weather, the no. 2 engine went out and all the the compass, turn and slip and air speed indicator ceased functioning. The weather was so violent that the bomber's altitude would change 1,000' during up drafts or down drafts and required each crew member to strap themselves in until they exited the storm near Tarawa and landed safely and spent the night while the no. 2 engine and gauges were repaired. On November ?, 1943 took off during the morning and continued the mission flying between the Ralak and Radak Islands then onward to Wotje. Approaching the target, the no. 2 engine again went out before the bomb run. After releasing their bomb load and hit by some anti-aircraft fire, the formation turned back to base and was intercepted by a few Zeros but they only closed to a far distance. During the flight back, the no. 2 engine was restarted then died again and was feathered and successfully landed back at Tarawa Airfield but elected not to stay overnight fearing a Japanese air raid and took off again bound for Funafuti Airfield. Halfway, the no. 2 engine failed again but arrived an hour later due to reduced speed, but managed to start the engine again prior to landing. During their approach at night, four searchlight tracked the bomber blinding the pilot. The co-pilot pulled up and circled but entered bad weather before successfully landing. Mission History On November ?, 1943 took off piloted by Larry Cowell with co-pilot Al Miller as one of nine B-24s staging through Tarawa Airfield on a bombing mission bound for Maloalap. After successfully landing at Tarawa Airfield to refuel and rearm and spent the night. The crew also included navigator Johnny Nettles, bombardier Red Weinstein, gunner Sgt Jake Lewis and gunner Sgt William Neill. The next day November ?, 1943 took off again flying between Jaluit and Mili and saw an Japanese reconnaissance plane shadowing the formation. Climbing to 20,000' for the bombing run, intercepted by 40-50 Zeros some dropping phosphorous bombs while others made attacks on the formation. This bomber was hit numerous times rupturing the inboard right wing fuel tank and damaged the no. 3 engine which was feathered to prevent leaking fuel from igniting. Also, hit by a 20mm shell in the radio compartment that severed all hydraulic lines and communications. Navigator Johnny Nettles was hit in the leg by a bullet and bombardier Red Weinstein was hit in his canteen. In the cockpit, Miller was hit by a bullet that impacted the throttle arm. Aboard, gunners Lewis and Neill both claimed an enemy fighter shot down. During the interception, the formation descended to 11,000' and due to the loss of power from the no. 3 engine, this bomber to stall towards the right wing and fell to 5,000' before the pilots could gain control of the engines and level out at 1,000' over the open sea. After flying 30 minutes, an island was spotted that appeared to be deserted. Circling it, the pilots offered the crew the chance to bail out but none elected. The crew decided to fly to the south for another fifteen minutes, if not return to this location to belly land on the beach. Flying southward for 15 minutes, nothing was spotted but after another ten minutes they saw an island on the horizon that proved to be Tarawa. The damaged bomber landed on three engines leaking fuel without radio, flaps or breaks but were able to extend the landing gear. Before landing, the crew fired a red and white flare indicating it was in trouble and had wounded aboard and managed to land safely and applied the emergency breaks at the end of the runway causing it to loop to the right causing the landing gear to fail and the wingtip to dig into the ground, 150 yards from the beach which was mined. Afterwards, this crew was assigned a new B-24J Liberator as a replacement aircraft. Wreckage Afterwards, a bulldozer dragged the damaged bomber off to the side of the runway. The bomber had 400 bullet or shrapnel holes and afterwards was stripped for usable parts. Among the damage was a 7.7mm bullet that entered the no. 2 engine compartment, struck a copper fuel line, gouging it for six inches before exiting, but did not rupture the line or cause a fire. While being stripped, photographed by a LIFE Magazine photographed showing the damaged right wingtip with the nose held up by an empty fuel drum. Ultimate fate unknown likely scrapped or otherwise disappeared. References Pete Johnson adds: "It is quite feasible that the spars were swapped on the production line or even the whole aircraft was mis-identified when the serial numbers were applied. The only real indicator would be the data plate located in the cockpit on the center console somewhere." Individual Aircraft Record Card (IARC) B-24D Liberator 41-24187 USAF Serial Number Search Results - B-24D-20-CO Liberator Liberator 41-24187 Grey Geese Calling page 54-55 Adventures of "Lil' Hiawatha" by Al Miller Thanks to Bob Livingston and Pete Johnson for additional information Contribute
Information |
B-24 |
| Discussion Forum | Daily Updates | Reviews | Museums | Interviews & Oral Histories |
|