|
|
|
|
| Missing In Action (MIA) | Prisoners Of War (POW) | Unexploded Ordnance (UXO) |
| Chronology | Locations | Aircraft | Ships | Submit Info | How You Can Help | Donate |
|
| IJN Hiryu 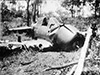 Australian Army February 27, 1942 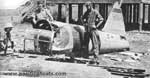 RAAF 1942 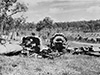 Stan Gajda c1960s  Stan Gajda c1960s 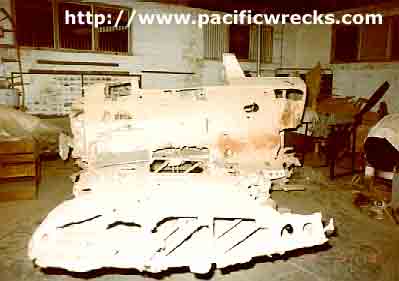 Stan Gajda 1980s 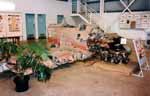 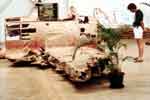 Pacific Ghosts 2001   Goh Loon 2008 |
Pilot Petty Officer Hajime Toyoshima (survived, POW, died August 5, 1944) Force landed February 19, 1942 Aircraft History Built by Mitsubishi on October 4, 1941. At the factory, painted overall gray with a black cowling. Delivered to the Imperial Japanese Navy (IJN) as Type 0 / A6M2 Model 21 Zero manufacture number 5349. Wartime History Assigned to Hiryu. Tail code BII-124 with a horizontal stripe above the code and a vertical stripe on the rear fuselage. Mission History On February 19, 1942 took off from Hiryu piloted by Petty Officer Hajime Toyoshima as one of thirty-six Zeros on a fighter sweep over Darwin. The formation included other A6M2 Zeros from Soryu plus D3A1 Vals and B5N1 Kates from Kaga and Akagi. While making a low pass over Darwin Harbor, hit by a .303 caliber bullet in the oil tank and began loosing oil. Returning, this Zero force landed on Melville Island. During the landing the plane impacted vegetation that damaged the wings, broke off the propeller and dislodged the engine and came to rest rest largely intact. During the landing, Toyoshima hit his face on the gun site and suffered facial injuries. used his parachute to wipe the blood off his face. Fate of the Pilot Afterwards, Toyoshima used his parachute to wipe the blood off his face and wandered away. Later, he was found by Aboriginal Matthias Ulungura from the Snake Bay Settlement who managed to disarmed him, take his pistol and escort him to Bathurst Island. On February 24, 1952 he was handed over to Sergeant Leslie J. Powell of the 23rd Field Company, Royal Australian Engineers who was on the island but was unarmed and was given pistol his pistol on a lanyard. On February 27, 1942 the Toyoshima and Powell were photographed together with Toyoshima's face bandaged. Afterwards, Toyoshima was taken to Darwin. Prisoner of War During his initial interrogation, he told the Australians his name was Tadao Minami born March 20, 1919 in Kanagawa-ken and was a farmer. In hopes of discouraging the Australians for searching for his Zero, he claimed he was an aerial gunner from a bomber based on Ambon that bailed out and swam ashore. He became the first Japanese Prisoner Of War (POW) captured in Australia. Initially he was assigned prisoner number PWJ 910.1 and later became PWJA.110.001 (also listed as PWJA.110001). To the contrary, his flight suit had the ideograph for "Hiryu" and was not stained with sea salt. Later his Zero and parachute with a blood stain was found. During one of his interrogations, Toyoshima's Senninbari (thousand stitch belt) was taken from him by an intelligence officer. On April 9, 1942 his internment began and as a prisoner was photographed from the front and side with his facial injuries still visible but healing. As a prisoner, he was transported to Redholme Manson in South Yarra, Victoria for further interrogation. On March 23, 1942 taken to Lavcony (?) 14C compound, then on April 4, 1942 arrived at Nayport Setenton (?) Barracks. Next, on April 9, 1942 he was taken to Hay Camp. Meanwhile, on April 17, 1942 police matched the blood stain on his parachute to his blood type. On June 6-15, 1942 he was hospitalized then returned to Hay Camp. On January 8, 1943 transferred to Cowra POW Camp. Between August 6-11, 1943 again hospitalized then returned to captivity. On August 28, 1943 until September 4, 1943 again hospitalized. Next, placed in detention, pending trial on September 19-23, 1943 the crime or charge is unknown. During October 4-11, 1943 again hospitalized as sick then returned to camp. By early 1944, there were 1,100 Japanese prisoners detained, larger than the capacity of the camp or guards. The aviators including Toyoshima made alliances with the other extremist Navy and Army prisoners. As time passed, they decided on a ban on all prisoner labor and secretly planned a riot and breakout with the goal of engaging the Australian guards in a suicidal battle to die honorably. Meanwhile, the prisoners gave the impression they were content and cooperative. Between May 13-15, 1944 hospitalized and returned to camp. Cowra Breakout On August 5, 1944 at 2:00am inside Cowra POW Camp Toyoshima signaled the start of "Cowra Breakout" with a bugle and hundreds of Japanese prisoners rushed to the perimeter fence near the No. 2 Vickers machine gun, towards the northeast F guard tower and Broadway gate. The Australians were initially caught by surprise then opened fire killing roughly 100 rioters with gunfire before they reached the gate. Meanwhile, some rioters managed to break into the officers D compound but were pinned down by gunfire as reinforcements arrived. During the riot, Toyoshima managed to reach a storm drain ditch just outside the perimeter wire, but was shot in the chest when he tried to move. Mortally wounded, he lit a cigarette, then cut his own throat and was found dead the next morning. The Cowra Breakout was the largest attempted prison break in history. A total of 231 Japanese prisoners including Toyoshima died in the riot many from self-inflicted wounds. Three others later died of wounds and 108 others were wounded. The Japanese managed to kill four guards and wounded four others. Wreckage This Zero force landed largely intact but sustained damage to the leading edge of the wing from vegetation. The propeller broke off and the engine was dislodged from the mount. The rear fuselage had ripples caused by the strain of the landing. When abandoned by the pilot, the cockpit canopy was left in the open position. By February 27, 1942 the Zero was discovered by the Australians who took a single photograph of the crash site. Afterwards, Australian personnel recovered the outer wings, rear fuselage without either stabilizers and the cockpit canopy. The recovered pieces were transported to Darwin Airfield. The fuselage was placed under a building and had many pieces of aluminum removed as souvenirs. Ultimate fate unknown, likely scrapped during the Pacific War or afterwards. The cockpit canopy was shipped to Eagle Farm Field and used for A6M3 Model 32 Zero (Hybrid) that was repaired to flying condition. After the crash site became known, Australian personnel removed all dataplates, cockpit instruments, instrument panel, removal access covers plus the two 7.7mm machine guns and two 20mm cannons. Only the main dataplate and shock absorber dataplate were documented. The fate or locations of the other items is unknown. The center section with the inner portion of the wings, part of the cowling and engine remained at the crash site with the instrument panel, access hatches, machine guns and cannons were removed. During the early 1960s, the wreckage was moved to Bathurst Island including a drop tank (unclear if the drop tank was from this Zero or recovered from elsewhere). Display By the 1980s, the remaining wreckage was moved to Darwin and placed into storage at the Australian Aviation Heritage Centre (Darwin Aviation Museum). Since the late 1990s, displayed at the Australian Aviation Heritage Centre (Darwin Aviation Museum). During the early 2000s, the display was enhanced by placing the Zero atop a small platform with the Sakae 14-cylinder air-cooled radial radial engine with two propeller blades with one blade removed. Hanging from the wall is a piece of the outer wing and profile view of this Zero. Nearby are paintings depicting the air war over Darwin and the photograph of the crash site. The Australian War Memorial (AWM) has three items in their collection related to pilot Hajime Toyoshima and his Zero. On public display is the bugle used by Hajime Toyoshima to signal the start of the Cowra Breakout (REL/04058) with the upper portion of the bell bent. In their collection but not on public display is his Senninbari (thousand stitch belt) REL49365 donated by the family of the intelligence officer who took it. Also in their collection but not on public display is a Zero dataplate for the front hydraulic shock absorber (REL/02094). The Royal Australian Air Force Museum Point Cook (RAAF Museum Point Cook) has two items related to pilot Hajime Toyoshima on public display his Japanese flag and flight suit. Memorials Toyoshima was buried at Cowra Japanese War Cemetery at grave QC 18. References Mitsubishi T "0" Navy SSF Maker's No. 5349 Found Crashed on Melville Island 24.2.42 WW2 Nominal Roll - Leslie Joseph Powell, NX160184 (N51613) Report on Internee [over typed with XXXXXX] Prisoner Of War Tadao Minami [Hajime Toyoshima] 21 April 1942 Internee [over typed XXXXX] Prisoner Of War Service and Casualty Form Identification No. PWJA.110.001 Tadao Minami Australian Post "Where Japs got the third degree" by David Sissons, July 17, 1986, page 3, 5 "War Comes To Australia" article by Robert Piper at display at RAAF Museum Point Cook The Hidden Chapters (1995) by Robert Piper Pacific Ghosts CD-ROM (2002) profiles this Zero Dariwn's Air War (Revised Edition) (2011) by Bob Alford page 38 AWM "The bugle and the breakout" by Claire Hunter 30 July 2019 Darwin Aviation Museum - Mitsubishi Zero A6M2 - Model 21 BII-124 Darwin Aviation Museum - Crashed Aircraft Zero (photo) Contribute Information Are you a relative or associated with any person mentioned? Do you have photos or additional information to add? Last Updated May 11, 2025 |
Zero Photo Archive Dataplate Main Dataplate Shock Absorber |
| Discussion Forum | Daily Updates | Reviews | Museums | Interviews & Oral Histories |
|