|
|
|
|
| Missing In Action (MIA) | Prisoners Of War (POW) | Unexploded Ordnance (UXO) |
| Chronology | Locations | Aircraft | Ships | Submit Info | How You Can Help | Donate |
|
| IJN Myōkō-class Heavy Cruiser 13,300 Tons 661' 9" x 68' x 20' 9" 10 x 203mm guns 6 x 120mm guns 8 x 127mm guns 2 x 13mm MG 12 x torpedo tubes two seaplanes 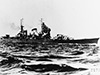 IJN 1931-1932 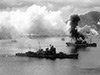 90th BS Nove 2, 1943 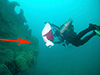 Kevin Denlay 2010 |
Ship History Built by Mitsubishi Shipbuilding at Nagasaki. Laid down March 16, 1925 as hull No. 420 on the no. 2 slipway as s Myōkō-class Heavy Cruiser. Launched March 24, 1928 as Haguro 羽黒 named after Mount Haguro (Mt. Haguro) in Yamagata Prefecture in Japan armed with 200mm 50 cal Type 3 (No. 1) guns. On October 1, 1928 Captain Keitaro Hara was assigned as chief equipping officer. Commissioned April 25, 1929 in the Imperial Japanese Navy (IJN) attached to Sasebo Naval District with Captain Keitaro Hara in command. On November 30, 1929 assigned to Captain Sekizo Uno. On October 22, 1930 embarked Emperor Hirohito and his entourage who spent two nights aboard then disembarked at Kirishima. On December 1, 1930 Captain Sonosuke Kobayashi assumes command. On October 10, 1931 Captain Naokuni Nomura assumes command. On February 14, 1933 Captain Jo Morimoto assumes command. On November 15, 1933 Captain Minoru Yamaguchi assumes command. On November 15, 1935 Captain Samejima Tomoshige assumes command. During 1936 at Sasebo Navy Yard in Sasebo undergoes reconstruction with her her original main guns replaced with with 203mm guns with the upgrade completed by June 29, 1936. On April 28, 1941 at Kure Naval Arsenal undergoes a second reconstruction. Assigned to Captain M. Terado. On December 2, 1941 assigned to CruDiv 5 with Myoko and Nachi. Wartime History On December 8, 1941 at the start of the Pacific War participates in "Operation M" the attack on the southern Luzon in the Philippines. On December 11, 1941 provides cover for the landing at Legaspi and remains in the area for the next four more days. On December 15, 1941 departs for Palau arriving two days later. On December 19, 1941 arrives at Davao Harbor to cover the landing for the next two days. On December 24, 1941 covers the landing at Jolo and five days later departs for Palau. On December 31, 1941 returns to Davao Harbor. On January 4, 1942 attacks the U.S. Navy anchorage in Malalag Bay then returns to Davao. While anchored at Davao Harbor, bombed by a B-17 from Java that failed to cause any damage. On January 9, 1941 departs Davao Harbor as part of "Operation H" the invasion of Celebes. On January 11, 1942 covers the landings at Menado and Kema and remains for three days. On January 24, 1942 covers the landing at Kendari. On January 26, 1942 USS Sailfish (SS-192) claims to hit Haguro with a torpedo but the cruiser was not damaged. On January 29, 1942 depart Davao via Bangka Roads and the next day covers the landings on Ambon. On February 5, 1942 covers the landings at Makassar. On February 8, 1942 engaged the enemy off Makassar then remains in the vicinity for two more days. On February 17, 1942 supports the landings at Dili and Kupang and remains in the area for three days. On February 24, 1942 departs Staring Bay. On February 26, 1942 when lifting her E13 Jake aboard the floatplane sustained damage. On February 27, 1942 participates in the Battle of the Java Sea and engaged with gunfire HMS Exeter and HMS Encounter. On March 1, 1942 engaged in another action off southern Borneo. PARTIAL LIST On May 7, 1942 participated in the Battle of the Coral Sea. On August 24, 1942 participates in the Battle of the Eastern Solomons. PARTIAL LIST In late January 1943, aided the evacuation from Cape Esperance on Guadalcanal. PARTIAL LIST On November 1, 1943 at 3:20pm departs Simpson Harbor with Myoko plus light cruisers and destroyers to attack the U.S. landing at Empress Augusta Bay off western Bougainville. In St. George's Channel they rendezvous with destroyer transports but proceed without them to assault the landing area only. On November 2, 1943 in the early morning during in the Battle of Empress Augusta Bay engaged U.S. Navy Task Force 39 (TF 39) light cruisers and destroyers. During the engagement, Haguro sustains light damage. By 3:37am disengaged from battle and returns to Simpson Harbor. Later that morning, targeted by U.S. Army Air Force (USAAF) B-25 Mitchells during a low level strike against Rabaul but was not damaged. During the air raid, photographed at low level by a B-25 Mitchell from 3rd BG, 90th BS. On November 4, 1943 departs Simpson Harbor bound for Truk arriving three days later. PARTIAL LIST In the middle of March 1944, due to aerial mines in the Johore Strait, ComCrudiv 5 move to Keppel Harbor on Singapore. PARTIAL LIST On June 19, 1944 participates in the Battle of the Philippine Sea. PARTIAL LIST During the Battle of Leyte Gulf October 23–25, 1944 suffered light damage including damage to the no. 2 turret. PARTIAL LIST On May 7, 1945 plans are finalized for "Operation Shoo" for a dash to deliver supplies and evacuate personnel in the Andaman Islands. The No. 1 Force of Haguro and Kamikaze will transport 650 tons supplies and evacuate two Army battalions and are scheduled to depart Keppel Harbor on May 10 and arrive the evening of May 12. The No. 2 Force includes Kuroshio Maru and CH-57 that are scheduled to depart Singapore on May 11 with 150 tons of supplies bound for Nancowry and arrive May 14 and evacuate 450 Army personnel. Meanwhile, Operation Dukedom begins when the Royal Navy was alerted by decrypted Navy signals about the operation and deploys submarines and Force 61 sorties from Trincomalee. On May 10, 1945 before dawn Haguro with Vice Admiral Hashimoto and Rear Admiral Sugiura aboard plus two E13A1 Jakes embarked and Kamikaze departs Keppel Harbor on Singapore via the Malacca Strait bound for Port Blair in the Andaman Islands to evacuate personnel. For the first leg of the voyage covered by No. 17 Hitoo Maru and SC 45 and SC 55. At 7:30pm evasive action is taking avoid enemy submarines HMS Subtle and HMS Statesman. On May 11, 1945 receives a report from Japanese land based planes of an enemy carrier force and is ordered to reverse course and hold at One Fathom Bank at the western end of the Malacca Strait. Meanwhile, No. 2 Force departs Singapore. Before midnight, Haguro is advised the British Fleet is retiring and the decision is made to refuel from Ashigara and contine the mission. On May 12, 1945 returns to Malacca Strait headed southeast. At 8:40am HMS Subtle fires four torpedoes aimed at Harguo that are spotted and maneuvers to avoid. Afterwards, Kamikaze and covering aircraft conduct anti-submarine attacks without result. At 11:00am arrives at the southern end of One Fathom Bank of the light bouy 16.5 miles west of Pulo Burnet and plans to speed to Port Blair two days later. On May 13, 1945 at One Fathom Bank, Ashigara arrives and refuels Haguro and Kamikaze then departs bound for Lingga Roads. Afterwards, No. 1 Force continues to hold off Pulo Burnett. On May 14, 1945 at 6:00am departs Singapore with Vice Admiral Hashimoto and Rear Admiral Sugiura aboard and two E13A1 Jakes embarked escorted by Kamikaze via the Malacca Strait bound for Port Blair in the Andaman Islands to evacuate personnel. On May 15, 1945 in the Indian Ocean northeast of Sabang when spotted by planes from HMS Shah (D21) from Force 61. Haguro spots a Liberator overhead at roughly Lat 7° 02N, Long 97° 02E and engages with her main guns firing Type 3 Sanshikidan anti-aircraft shells and claims it as shot down. At 1:30pm informed that Japanese planes have spotted an enemy heavy cruiser and two destroyers south of Sabang Island headed southeast and a reversal of course is ordered. Around 3:00pm spots Kuroshio Maru and CH-57 with evacuated personnel returning from Nancowry Island in the Nicobar Islands. At 3:30pm the Haguro group is diverted to Penang. At 3:41pm engaged by three Avengers from No. 851 Squadron launched from HMS Emperor (D98), one that drops two 500 bombs and claims a hit, but Haguro was not damaged but her position reported. After 5:00pm, Haguro is informed enemy cruisers and destroyers are heading towards Malacca Strait and proceed towards One Fathom Bank at 28 knots but later speed is reduced to 24 knots with an estimated arrival time of 5:30am the next morning. Meanwhile, 26th Destroyer Flotilla under Captain Manley Power were ordered to intercept including HMS Saumarez (G12), HMS Verulam (R28), HMS Vigilant (R93), HMS Venus (R50) and HMS Virago (R75). At 11:40pm during a heavy storms the destroyers make radar contact with the Japanese warships at a distance of 39 miles and begin to close the distance. Sinking History On May 16, 1945 after midnight in the Strait of Malacca (Malacca Strait) with Kamikaze close behind as the British destroyers approach undetected and close to 28,000 yards and array themselves in a semi-circle spanning from northwest to the east. At 1:00am, Haguro spots the enemy only 12,000 yards away and begins zigzagging and turns to the northwest as the destroyers increase speed in pursuit. At 1:05am reverses course to the southeast with the destroyers only 6,000 yards away at the start of the Battle of the Malacca Strait (Battle off Penang, Sinking of Haguro). At 1:14am the destroyers open fire and release Mark IX torpedoes. Haguro returns fire straddling HMS Saumarez (G12) twice with main gun shells and claims a hit. At 1:20am hit by a torpedo that floods the forward generator room and causes fires in fuel cargo on deck and lost speed and develops a 15° list to port. Aboard, the forward magazine was flooded and generates smoke while fuel drums are tossed overboard. At 1:35am a second torpedo hits the port flooding the forward engine room and causes the list to increase to 35° and dead in the water with anti-aircraft guns on the port side unable to fire due to the list angle. Aboard the bridge, Vice Admiral Hashimoto and other senior officers are killed and Captain Ono is injured by gunfire. The main guns are disabled from the power outage while a few anti-aircraft guns on the starboard side continue to return fire. Counter flooding is ordered to flood the starboard engine room. Another torpedo hit the forward section causing more damage. At 2:02am the British cease fire. At 2:32am, Haguro sank bow first at approximately Lat 4° 49' N Long 99° 42' E roughly 55 miles west-southwest of Penang. During the engagement and sinking, 900 crew are lost including Vice Admiral Hashimoto and Rear Admiral Sugiura (posthumously promoted Vice Admiral). During the same engagement, Kamikaze sustained light damage but escapes to Penang. On June 20, 1945 Haguro was officially removed from the Navy List. Rescue On May 17, 1945 three E13A1 Jakes from Penang spot survivors in the sea and release life rafts and supplies. Later that day, Kamikaze returns and rescues 8 officers and 230 sailors including 10 sererely injured. Soon afterwards, six of the severely injured die. Shipwreck On March 4, 2004 a group of divers from MV Empress including Kevin Denlay located Haguro at a depth of 220' / 67m approximately 55 miles west-southwest of Penang at roughly Lat 4°49'N, Long 99°42'E. The shipwreck is upright, covered in trawler nets with her hull opposite her forward turrets buried in the seabed to about her original waterline, but this level gradually reduces until at the stern her outer propellers and shafts are actually up above the seabed. In 2005, a reunion group comprised of both British veterans from the 26th Destroyer Flotilla and Japanese veterans from Haguro Survivors Association (HSA) and Kamikaze Survivors Association (KSA) held a joint ceremony on a boat and respresentatives from both sides took turns to lay wreaths on the sea in the vicinity of the shipwreck. During 2005 the same group of divers from MV Empress including Kevin Denlay again dove the wreck but visibility was very poor with strong and erratic currents. During 2006, a group of divers from MV Empress again dove the wreck but visibility was very poor with strong and erratic currents. During November 8-23, 2010 Operation Dukedom a wreck survey was conducted by group of divers from MV Empress including Kevin Denlay. Her foremast and the top half of the bridge structure are missing/collapsed. Her mainmast is collapsed. Her funnels are missing. British hits are visible in places. The bow section forward of No. 2 turret is decimated. The No. 1 turret and barbette were completely uprooted and now lay across the wreck, the rear of the turret on the starboard sea bed and the barrels pointing vertically towards the surface. Her No. 2 turret is trained to starboard at approximately the 1 o’clock position, with its roof collapsed and both barrels and breach blocks missing (not replaced after bomb damage at Leyte Gulf). The no. 3 turret guns are askew and trained to the port quarter in the 8 o’clock position. Both her stern main turret guns point almost directly astern. Just behind the no. 5 turret, the wreck is broken completely in half, although the stern section is still partially attached and heavily damaged on the port side. During 2014, the shipwreck was illegally salvaged for scrap metal and has been largely or fully removed. References IJN Haguro: Tabular Record of Movement Naval History and Heritage Command (NHHC) Air Strikes on Rabaul 2–11 November 1943 (photos) Sink the Haguro! The Last Destroyer Action of the Second World War (1979) by John Winton Japanese Cruisers of the Pacific War (1997) pages T1.7 note, 86-87, 107-109, 113, T3.8, P3.3, P3.10, D3.2, 125, 151, 212, 220, 225-228, 252, 263-265, 269, 274-276, T6.19, P6.1, D6.1 inset, D6.3, D6.17, 296, T7.1-T7.3, 298-301, T7.4, 308, 311-312, T7.7-T7.8, 314-315, 318-319, 321, T7.10, 334, 335n, T7.12-T7.14, 336, 342-349, 352, 354-355 (sinking), T7.15, 359, P7.7. D7.15, T8.9, T8.11, 595, 599, 660, 721, 864 (index Haguro) Explorers Club Expedition Operation Dukedom 2010 EC Flag 52 Report [PDF] Royal Navy Research Archive - The Sinking of the I.J.N. Haguro The Last Sunset by Ross Watton depicts HMIJS Haguro and HMIJS Kamikaze Thanks to Kevin Denlay for additional information Contribute
Information |
220' / 67m Photo Archive |
| Discussion Forum | Daily Updates | Reviews | Museums | Interviews & Oral Histories |
|